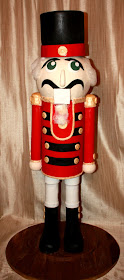
So every year for my father's Christmas party at his work I make a cake. You may remember past cakes such as my Maryland blue crab cake. Well each year I try to out due the year before. This year I decided to make a 3-D nutcracker cake. I knew that getting this structure to stand would be a challenge, but I'm always up for a challenge. I think the finished nutcracker looked awesome, and I must admit I'm pretty proud of it.
So since it is the season of giving I decided to snap a few pictures along the way to show how this cake came together. As always I may have missed a few steps in the haste to finish the cake, but feel free to ask any questions you might have. Merry Christmas!
So this is the structure that we started with to build the cake. We had two capped PVC pipes that were drilled into a base board for support. On top of that we had two boards with flanges and a pipe connecting the two. The cake would be placed between the two boards with the center pipe for support.
This photo shows how I stacked the cake on the board. Please be aware to keep the cake from touching any metal I covered each board and flange in fondant and covered the center pipe with a clean PVC pipe.
You can see here that the flange and board were both covered in fondant. The top board was then screwed into place essentially sandwiching the cake between the two boards.
After the board was in place I iced and covered the entire body of the nutcracker in one seamless piece of fondant. I then added all of the details such as piping and buttons.
Next, I covered the PVC legs in fondant and added his boots as well. I used piping gel to make the fondant stick to the PVC pipe. The boots were made by shaping rice cereal treats, and then covering them in fondant.
Here is the structure we used for the arms. Two (1/2 inch) PVC pipes with caps on one end and styrofoam balls hot glued to the other end. Jason pre-drilled holes in the arms so that we could drill them into the top board when they were covered in fondant.
In this picture you can kind of see the drill hole that was made to attach the arm to the structure. I then covered that hole with a fondant button and nobody knew it was there.
The head was an 8" styrofoam ball that I covered in fondant and attached to the board using hot glue. Please be aware that the body of the nutcracker was made from 6" cakes so we needed a larger head in order for him to look proportional.
I used cotton candy to made the hair and beard of the nutcracker. Unfortunately I learned the hard way that cotton candy does not hold up well for long periods of time so if using this technique I would suggest placing it on the head right before you are about to display the cake. I loved the way the cotton candy made the nutcracker look; I just wish it had held up longer.
I made the hat from two 6" styrofoam rounds. I wanted the hat to be removable so that the cake could be transported by car. Since the cake did not need to serve that many people most of the structure was styrofoam, however you could easily have made the hat out of cake as well and secured it to the top of his head.
The cake was really tall with the hat on top. As you can see here it was over 3ft tall with the hat, which is why I wanted to be able to remove the hat for transport. The cake was roughly 28" tall without the hat on the head. I am not quite sure exactly how tall the legs or body were. I know the body portion of the cake was roughly 12" tall, so the legs were probably a bit shorter than that. You can however, choose how tall you would like to make your own cake. Please be aware that I do not have exact heights or dimensions for the PVC structure. We kind of eyeballed what we thought would look good and went with that. So if you want to have a much shorter nutcracker just shorten the everything on the structure until you think it looks proportional. However, keep in mind when shorten the legs and body you will also need to make the cake smaller to make the proportions look correct.
I hope you enjoyed this tutorial and that you will use it to make your own nutcracker cake. I hope everyone has a very Merry Christmas, and Happy Holidays.


It is so lifelike - you did a fantastic job! - Thank you for sharing the Nutcracker Soldier in this tutorial.
ReplyDeleteI LOVE it!! What an incredible creation! Thank you so much for sharing you techniques. He is just fabulous. Congratulations and thanks again for so generously sharing your caking knowledge :)
ReplyDeleteThank you! Exactly what I was looking for! So needed the internal structure info!
ReplyDeleteBeautiful
ReplyDeleteStunning! Thank you for sharing! You are so creative!
ReplyDelete