Showing posts with label hoilday ideas. Show all posts

Monday, May 5, 2014

Mother's Day Cupcake Bouquet Tutorial

With Mother's Day quickly approaching I wanted to share this super sweet and easy cupcake bouquet tutorial that any mother would love! 
So first up you will need the following items to make your cupcake bouquets. 
  • Terracotta pot
  • Acrylic paint
  • Paintbrush
  • Mini cupcakes
  • Toothpicks
  • Styrofoam ball
  • Icing in different colors
  • Piping tips Wilton 2D, Bakery Crafts 68, Wilton 32, Wilton 352
  1. Start by having child(ren) paint a fun design on the pot for their mother. After the pot has dried seal pot with clear acrylic sealer.
  2. After the pot is completely dry insert Styrofoam ball into pot. You want about half the ball to stick out of the pot so you may attach the cupcake flowers.
  3. Ice the cupcakes to look like flowers using assorted tips.
  4. After cupcakes are iced apply cupcakes to Styrofoam ball using toothpicks. You may need to use more than one toothpick per cupcakes. Try to get the cupcakes as close as possible to avoid to many large gaps. 
  5. Use the Wilton 352 leaf tip to fill in any holes between cupcakes and present to Mom!
  6. After the cupcakes are consumed Mom can use the pot for planting her favorite flower (that you also bought her for the occasion)!


  7.  He has no idea what is happening to him!
     My little helper loves to bake!


How to Ice Cupcakes
  • Rose
Start with a piping bag filled with icing color of your choice and the Wilton 2D tip. Start with the tip in the center of the cupcake and apply pressure. Swirl the design outward to complete the rose. 


  • Mum
Start with piping bag filled with icing color of your choice and Bakery craft tip 68. Place tip on the outer edge of the cupcake and apple pressure and pull away to make a petal. Continue around the cupcake to complete one row. Once first row is complete pipe next row directly on top until the entire cupcake is covered in petals. 


  • Ball Flower
Start with piping bag filled with icing color of your choice and Wilton tip 32. Place tip on outer edge of cupcake and apply pressure to make a small dot of icing. Continue applying dots around cupcake until entire cupcake is covered. 


Have fun with this project! If  you do not have certain tips or piping bags don't worry cupcakes do not have to look exactly like a certain flower to look nice.

Tuesday, April 2, 2013

Easter!

Hey guys just wanted to share the Easter desserts I made this year! If you haven't already seen the tutorial I posted on how to make the bunny butt cake then go check it out! I also made coconut bunny tails from the left over cake scraps. Lastly, I made rainbow Easter cookies because right now my nephew is really into rainbows. It always makes you feel happy when a two year old walks in and say "Ooh RAINBOW cookies".
 

I was really happy with how the cookies turned out and I loved all the bright colors.

Here is my nephew Owen showing me how to rake the carpet.

He is currently the only child on this side of the family so he doesn't have much competition for Easter egg hunts. That will soon change however, when his little brother arrives in August. I'm sure next year will be an all out race for the eggs.

Here is our attempt at a picture with Owen.
Attempt number two is better than one but still no smile. Oh well better then last years picture where he is clearly scowling at the camera.
I hope everyone had a wonderful Easter with their families! Check back soon because we have another bog giveaway coming up that we participatin in and you won't want to miss out!

Saturday, March 30, 2013

Easter Bunny Butt Tutorial

Every year for Easter my family has to have a coconut cake. I don't know what it is about spring but, it always makes me want to eat a good coconut cake! Yum! So this year I wanted to make the traditional coconut cake with an Easter twist. This cake is super quick and easy to make so I made this tutorial so hopefully you cake make this cute cake for your family. 

First, you want to start with a half ball cake that is filled and crumb coated. If you don't know how to achieve a half ball please check out my elephant tutorial where I explain how it is carved.

While the cake is firming up you will need to make a cake ball for the bunny's tail. After forming the cake balls pop them in the freezer for a few minutes to let them firm up a bit.

After the cake pops are firm dip your stick into the melted chocolate and then directly into the cake pop. 

Then immediately dip the cake pop into the melted chocolate. 


Let some up the excess chocolate drip off before moving to the next step.
Next roll your still wet cake pop in shredded coconut. I used Baker's angel flake coconut that comes in the bag but, you can use whatever type you choose. I also, put my coconut in the food processor in order to make the coconut flakes finer.


Here are two little bunny tails! 
(Making bunny tails is also a cute idea for the left over cake scraps.)

After you have made the bunny tails ice you cake in a thick layer of buttercream and then cover in the remaining coconut flakes. Make sure to press the coconut into the cake so that it sticks.
After you have finished covering the cake set it aside so you can work on the feet. I made the feet from fondant and then let them dry a bit while I worked on the cake board. Make sure you don't make the feet to flat. 

Cover the board in a thin layer of green buttercream.

Then place you cake on the board and add a thick layer of green buttercream around the base. Don't worry if it is messy because it will be covered by dirt (ground Oreos).

Add the feet to the cake using dowels and, buttercream to hold them in place. Ground Oreos in a food processor and, then add the "dirt" to the perimeter of the cake. Press the "dirt" into the buttercream to ensure that it sticks to the board and cake. 

Continue to add the "dirt" to the cake border until it is completely covered and you are happy with the results. You can always go back later and add more dirt to cover up any imperfections.

Next, add a buttercream grass border to finish of the edge of the cake board. Finally don't forget to add your bunny tail to complete your cake. Be careful when pushing you bunny tail into the cake so that you don't break it.


So there you have it a simple cute Easter cake that your guests will love. If you have any questions please let me know. I will post my full Easter dessert spread a little later.
Happy Easter!

Wednesday, January 23, 2013

Valentine's Day Dessert Pails

I'm so excited that Valentine's day is right around the corner! This year we will be offering Valentine's Day dessert pails. This is a great way to show the loved one in your life how sweet they really are to you. All pricing will be up on the website or you can always call or email to place you order!

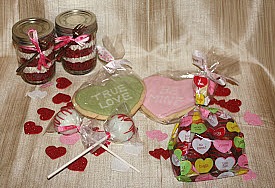
This first option will contain 2 red velvet with cheesecake buttercream cakes in a jar, 2 chocolate cake pops, 2 conversation heart sugar cookies, and 4 chocolate covered strawberries plus a cute little Valentine's day themed pail.


The other option is 1 red velvet with cheesecake buttercream cake in a jar, 1 chocolate cake pop, 1 conversation heart sugar cookie, and 2 chocolate covered strawberries plus a Valentine's day themed pail.

 Please be aware that pail designs may vary. We will accommodate different flavor options for the cakes in a jar and cake pops if desired. For more information on pricing click here.