Wednesday, February 23, 2011

Purple Hippo Cake Tutorial

Since my wonderful husband is a welder/fabricator, he can make pretty much any cake stand I need in order fulfill an order. I can take an order, and then figure out how I am going to make it come to life afterwards.  I am lucky in that way.

The purple hippo cake was for a little girl's birthday that liked hippos, the color purple, and dance, so, naturally we came up with a purple ballerina hippo. The challenge of this cake was support since the middle portion of the hippo would be the widest and would be resting on two smaller legs. Well, my husband came up with a great support structure to hold all of the cake in place. He made a support pole that ran through the entire cake for stability, and then plates of aluminum in between to hold the middle section and the head. The legs were made of rice cereal treats and formed around the center support pole all the way up to the first plate.


Then, the cakes were stacked, carved, and iced on top of the support plate. This process takes a little bit of precision; since the plate that supports the head needs to be screwed into the support pole, the cake needs to be carved to look proportional.


This picture shows the support plate for the head, in place, and covered in fondant.


The head was also made out of rice cereal treats and covered in fondant.


The arms were again made out of rice cereal treats and covered in fonadant, then attached with dowels into the side of the cake.

Here, I am adding the finishing details to the cake!


Here is the finished cake! I am pretty happy with how the cake turned out! Next time, maybe I will try to challenge myself by making the hippo pirouette. Although this stand was custom made by my husband, it could have easily been made by a trip to the home improvement store. If you have any questions about this stand, feel free to ask! Hope you enjoyed this tutorial.

Friday, February 18, 2011

Mini Tiered Cakes

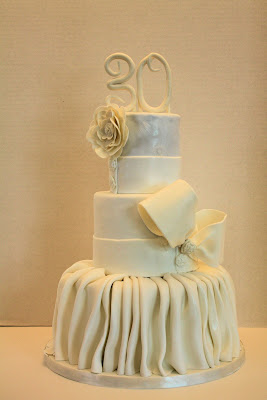
I wanted to share with you how I make a smaller cake have a large impact for an affordable price. When I have a customer who needs fewer servings, but still wants to make an impact, I suggest a smaller three tiered cake. Instead of using 10", 8", and 6"tiers, I use an 8" tier as the bottom, and then a 6" tier in the middle, and a 4" topper tier. By doing this, I end up saving the customer 30 servings of cake but still giving them the three tiered looked that they want.

The first cake was a very special 30th anniversary cake for a friend of the family. The daughter-in-law ordered the cake as a surprise for the couple. The wife was so happy and shocked that she cried which really made the cake worth it. I wanted the cake to be special and have a large impact but they only needed a couple of servings so I choose to do a smaller three tiered cake and I think it really looked great!


 Fantasy flower!


This next cake was a smaller three tiered cake for a small retirement party. I love the modern look of this cake and love the way the colors look together. The recipient of this cake was so surprised and excited by this cake that she didn't even cut it until days after the party!


 These simple colorful flowers make a big statement on this cake.


The next cake was made for a small wedding with lavender and white as the color scheme.


This last cake I made for my cousins baby shower. I used the same colors that she picked for her bedding in the cake. I think that it came out really cute and she was thrilled with the result!


I hope that this shows how you can make a large impact with a smaller cake. This is one way to save some money on servings but still have a nice three tiered cake for the party and photos. Plus when you look back at the photos you won't be able to tell that the cake was a mini tiered cake. Hope you enjoyed this! Let me know which one was your favorite!

Monday, February 14, 2011

Happy Valentine's Day!

So I know that for most of you Valentine's Day is almost over but I still wanted to share my Valentine's day dessert table with all of you. The colors I choose to go with are pretty standard for Valentine's day and I added a polka dot motif throughout the table as well. I hope you enjoy!

The banner is from Lily's Laundry and the dessert tags I made myself to match the table design.


For the cake I went with a modern tailored look. The design for the top and bottom tier was a design I first saw made by the Cakegirls and loved the way it looked so I had to use it on this cake! I think the cake is modern and sweet and perfect for Valentine's day!


Don't you just love these mini cupcake dishes that I found at the Pottery Barn outlet. They are super cute and display individual cupcakes beautifully.


Hope everyone has a very sweet Valentine's Day!

Friday, February 11, 2011

Valentine's Day Cupcakes

Here are some Valentine's Day cupcakes that I wanted to share with all of you. I hope you like them! I used my new polka dot patterned cupcake wrappers and I think they look super cute. I'm a sucker for anything polka dotted!


Next up are ribbon rose cupcakes. I love to make ribbon roses because they are super easy to make but they give a nice whimsical look to a cupcake or cake. Stay tuned I will do a tutorial on how to make these cute roses in the next couple of weeks!


Two hearts!


I love these glitter letters. They look even better in person. I took fondant letters that I cut out and let them dry a little until firm enough to pick up. Then I painted on some Crisco to each letter (you can use piping gel as well but Crisco is less sticky). Next on a piece of computer paper I laid each letter out and sprinkles disco dust heavily over each one. Then tap each letter off and arrange them however you want on your cake or cupcakes. Lastly just take the paper fold in half to make a funnel and collect all let over disco duct back into your container. Super easy!


I hope you enjoyed these cute Valentine's Day cupcakes. Let me know which ones are your favorites! 

Monday, February 7, 2011

Colorful Bridal Shower

I am so happy to finally share this gorgeous bridal shower with you! Once again I teamed up with Kim Stagi of Two Little Birds to create a fabulous bridal shower.

For the cake the bride to be found a picture online that she really wanted me to replicate. Since I don't really like to replicate someone else’s design I took that cake and added my own touches (sorry I don't know the original cake designer). The cake was traveled themed with a suitcase on the bottom, a hat box for the middle tier, and a purse to top it off. The bride picked the colors and at first I was a little apprehensive to use them but in the end I think they looked great together.


I love the way the roses add a pop of color against the blue suitcase!


Check out the rest of the amazing party set up! I just love the hot pink.


I love the gorgeous centerpieces that Kim made.

All the great gifts for the bridesmaids!

Wow! What a great party! Glad I could be a part of it! 

Saturday, February 5, 2011

Football Anyone?

I saw these on Bakerella last year and just had to make them for the big game! They are super cute and really yummy. ENJOY!