Monday, January 31, 2011

Man Cakes

Since the Superbowl is quickly approaching I thought that I would share some manly cakes with all of you!

First up is a fishing cake. The groom really likes fishing and the bride wanted to surprise him with a cake. The fish is a rock fish and was made to look like it was jumping out of the water!


Next up is a VW bus cake for a groom that loved his bus and the beach! The bus and the sand are all edible.


The next cake was made for my brother's wedding. My brother loves everything Beatles so I designed a Yellow Submarine themed cake! All the figures were made by my wonderful husband and sculpted after characters from the movie. The characters were made from polymer clay so that my brother could keep them. 
 

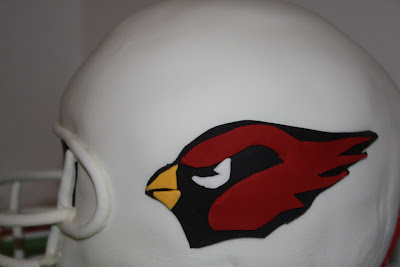
Lastly, we have a football helmet cake for a Cardinals fan! I hope this put you in the mood for some football this weekend! (Even though the Cardinals won't be playing)! May the best team win (hopefully that team won't be Pittsburgh but hey I'm not bias)!


Hope you enjoyed all of these man influenced cakes!

Monday, January 24, 2011

A Very Merry Unbirthday

I have been waiting to share this awesome party with everyone. Kim Stagi from Two Little Birds Events and Design came up with this idea for her children's joint birthday party. Since both her kids have birthdays around the same time, she decided to have one huge party. The theme of the party was Mad Hatter—which is a totally awesome theme for both boys and girls. All of the guests came dressed up with different "mad hats". A totally great idea!  Thanks for all the photos, Kim!


For the cake, I was given total freedom of design. I decided to do a Mad Hatter cake with a Cheshire Cat teapot balanced on top. I also added little fondant drinking bottles and cakes that said "drink me" and "eat me". I attached a note to the hat that said "Have a Very Merry Unbirthday"! We also made salted caramel cupcakes, vanilla cake balls, and mini cherry and apple pies.


How cute is the birthday girl in her princess attire? Love it!


 Both birthday girl and boy blowing out the candle!
I hope you all enjoyed this party as much as I did. To see more pictures from this party go here.

Friday, January 21, 2011

Cakes for Little Girls

I wanted to share some cakes I have done recently in the past month. I noticed that a lot of them have been for little girl's parties. I love making cakes for girls because there are so many fun, different themes you can go with. Plus, girls seem to give a more enthusiastic reaction, when they see their cake, than most boys (Not always, but mostly).

So, first up was a cake for a baby shower. The theme was a tea party, which I thought was a very creative and fun theme. I was told the colors were pink, raspberry, and lime green, but other than that, I have free range on what to do. The entire teapot was vanilla cake with the spout and handle made of gumpaste. The teacups were made from gumpaste using real teacups as a form. I think the teacups are my favorite part! I also added a rattle and pacifier to tie in the baby shower theme. The cake fit beautifully in the party setting, and it looked like the party was going to be a lot of fun for all involved.


The next cake for a princess-themed party. The dad wanted a cake with a princess crown sitting on a pillow. He also wanted the cake to be pink because that was the birthday girl's favorite color. I think any princess would have loved this cake at her party!


The next cake was a bit of a challenge because of the size the head needed to be in order to match the Hello Kitty character. I think that the cake turned out great, in the end, and is perfect for a girl's birthday!

The next cake was a fun baby shower cake that matched the crib bedding. Simple and sweet!


Lastly, I had to include my niece's Strawberry Shortcake cake. I love the fun and whimsical elements of this cake. My husband made the Strawberry Shortcake character, and I think he nailed it! For instructions on how to construct this cake, check out my topsy turvy stand tutorial.


I hope you all enjoyed! Leave me a comment, and let me know which one is your favorite! 

Monday, January 17, 2011

Cheesecake Pops

I decided to try my hand at cheesecake pops this past week, and let me say they were amazing! This is my first time making cheesecake but it was super easy and turned out wonderfully.


This is a recipe from Jill O'Connor's book, Sticky, Chewy, Messy, Gooey.

Cheesecake Pops

Makes 30 to 40 pops

Five 8-ounce packages cream cheese, at room temperature

2 cups sugar

¼ cup all-purpose flour

¼ teaspoon salt

5 large eggs

2 egg yolks

2 teaspoons pure vanilla extract

¼ cup heavy cream

Boiling water as needed

30-40 8-inch lollipop sticks


1 pound semisweet-flavored, milk chocolate flavored, or brightly-colored confectionery coating (also known as summer coating or wafer chocolate)

Directions:


Preheat oven to 325°F.

In a large bowl, with an electric mixer set a low speed, beat together the cream cheese, sugar, flour, and salt until smooth.  Add the whole eggs and the egg yolks, one at a time, beating well (but still at low speed) after each addition. Beat in the vanilla and cream. (Make sure you scrape down the bowl during the process to incorporate all the ingredients.)


Lightly grease a 10-inch cake pan (not a spring form pan).  Pour the cheesecake batter into the cake pan and place in a larger roasting pan.  Fill the roasting pan with boiling water until it reaches halfway up the sides of the cake pan.  Bake until the cheesecake is firm and slightly golden on top, 35 to 45 minutes.


Remove the cheesecake from the water bath and cool the room temperature.  Cover the cheesecake with plastic wrap and refrigerate until very cold, at least 3 hours or up to overnight.
(It wasn't that golden it's just a bad lighting.)

When cold and very firm, scoop the cheesecake into 2-ounce balls and place on a parchment paper-lined baking sheet.  Carefully insert a lollipop stick into each cheesecake ball.  Freeze the pops, uncovered, until very hard, at least 1 to 2 hours.


When the cheesecake pops are frozen and ready for dipping, prepare the chocolate coating.  Place half of the chocolate wafers in a microwave-safe bowl.  Microwave on high for 30 seconds.  Remove from the microwave and stir.  If the chocolate is not completely melted, microwave for 30-second intervals, stirring until smooth.

Quickly dip a frozen cheesecake pop in the melted chocolate, swirling quickly to coat it completely. Hold the pop over the melted chocolate and shake off any excess. Place the pop in a clean parchment paper-lined baking sheet to set.  Repeat with remaining pops, melting more chocolate wafers as needed. 

Refrigerate the pops for up to 24 hours, until ready to serve.


I hope that everyone tries this recipe, it is fabulous!

Thursday, January 13, 2011

Fabulous Finds!

This past weekend, I had the opportunity to go to HomeGoods and do a little shopping. I absolutely love this store, and they have such great stuff and super deals. I just wanted to share with you one of the great deals that I got this weekend!
Aren't these the cutest cake plates ever? I love them, and I got all three of them for under $50 dollars which —is really a steal. They had these plates with all different color ribbons in them, and even had red ones for Valentine's Day. I bought black because I figured that it would be the most versatile, and plus, I can always change the ribbon to whatever I want. I can't wait to put these to good use. I love when I find a good deal. This weekend, my wonderful husband is taking my antiquing looking for vintage cake plates! I cannot wait to go, and of course will show you all my great finds when I get back!

Monday, January 10, 2011

Hawaii

So now that I finally uploaded our photos from our honeymoon in Maui, I thought that I would share them! Maui was breathtaking at every turn, and there were some many photos to choose from but I thought I would share the highlights of our trip. I also wanted to share some ocean-inspired cakes that we did recently, in keeping with the theme of today.


 Snorkeling with the sea turtles!


This picture amazes me because it looks like we Photoshopped it.


Sunrise on top of  Haleakalā summit of 10,000 feet.


Now for the cakes! The first cake was created by Jason for a competition and I think he did an amazing job. Everyone was amazed at how the turtle appears to be swimming above the ocean floor. The turtle is pretty cute too!


The second cake was for a little girl's birthday. She loves sea turtles (who doesn't?), so we decided to make her one large sea turtle. I love the way the design on the shell turned out!


I hope you enjoyed my trip photos today!