Wednesday, December 19, 2012

Nutcracker cake and Tutorial

So every year for my father's Christmas party at his work I make a cake. You may remember past cakes such as my Maryland blue crab cake. Well each year I try to out due the year before. This year I decided to make a 3-D nutcracker cake. I knew that getting this structure to stand would be a challenge, but I'm always up for a challenge.  I think the finished nutcracker looked awesome, and I must admit I'm pretty proud of it.

So since it is the season of giving I decided to snap a few pictures along the way to show how this cake came together. As always I may have missed a few steps in the haste to finish the cake, but feel free to ask any questions you might have. Merry Christmas!

So this is the structure that we started with to build the cake. We had two capped PVC pipes that were drilled into a base board for support. On top of that we had two boards with flanges and a pipe connecting the two. The cake would be placed between the two boards with the center pipe for support.
This photo shows how I stacked the cake on the board. Please be aware to keep the cake from touching any metal I covered each board and flange in fondant and covered the center pipe with a clean PVC pipe.
You can see here that the flange and board were both covered in fondant. The top board was then screwed into place essentially sandwiching the cake between the two boards.

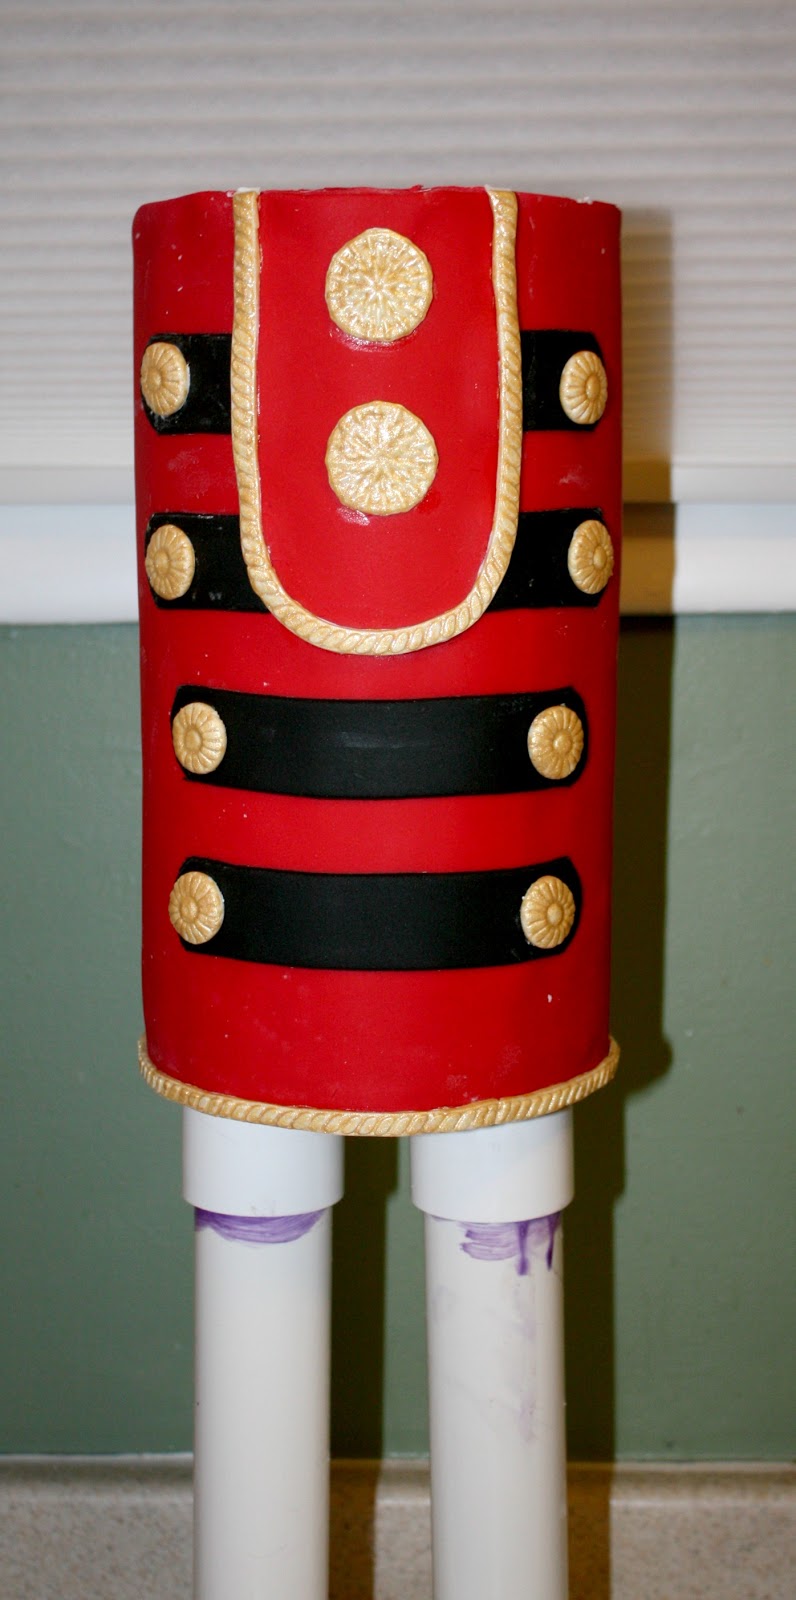
After the board was in place I iced and covered the entire body of the nutcracker in one seamless piece of fondant. I then added all of the details such as piping and buttons.


Next, I covered the PVC legs in fondant and added his boots as well. I used piping gel to make the fondant stick to the PVC pipe. The boots were made by shaping rice cereal treats, and then covering them in fondant.
Here is the structure we used for the arms. Two (1/2 inch) PVC pipes with caps on one end and styrofoam balls hot glued to the other end. Jason pre-drilled holes in the arms so that we could drill them into the top board when they were covered in fondant.

In this picture you can kind of see the drill hole that was made to attach the arm to the structure. I then covered that hole with a fondant button and nobody knew it was there.
The head was an 8" styrofoam ball that I covered in fondant and attached to the board using hot glue. Please be aware that the body of the nutcracker was made from 6" cakes so we needed a larger head in order for him to look proportional.
I used cotton candy to made the hair and beard of the nutcracker. Unfortunately I learned the hard way that cotton candy does not hold up well for long periods of time so if using this technique I would suggest placing it on the head right before you are about to display the cake. I loved the way the cotton candy made the nutcracker look; I just wish it had held up longer.
I made the hat from two 6" styrofoam rounds. I wanted the hat to be removable so that the cake could be transported by car. Since the cake did not need to serve that many people most of the structure was styrofoam, however you could easily have made the hat out of cake as well and secured it to the top of his head.


The cake was really tall with the hat on top. As you can see here it was over 3ft tall with the hat, which is why I wanted to be able to remove the hat for transport. The cake was roughly 28" tall without the hat on the head. I am not quite sure exactly how tall the legs or body were. I know the body portion of the cake was roughly 12" tall, so the legs were probably a bit shorter than that. You can however, choose how tall you would like to make your own cake. Please be aware that I do not have exact heights or dimensions for the PVC structure. We kind of eyeballed what we thought would look good and went with that. So if you want to have a much shorter nutcracker just shorten the everything on the structure until you think it looks proportional. However, keep in mind when shorten the legs and body you will also need to make the cake smaller to make the proportions look correct. 
I hope you enjoyed this tutorial and that you will use it to make your own nutcracker cake. I hope everyone has a very Merry Christmas, and Happy Holidays.

Wednesday, November 28, 2012

Recent Wedding Cakes


So since it is technically still fall I thought I would share with everyone the my recent fall wedding cakes. First up was this beautiful three tier cake with fantasy flowers. The bride Lauren came to me with a photo of a cake that she wanted me to replicate. We changed a few aspects of the cake but pretty much kept everything the same since she was in love with the design. I unfortanely do not know the original artist so I can't give them credit.

I think the cake turned out wonderfully and I love the modern design. The wedding was held at a yatch club in Delaware which was an absoulutely amazing backdrop for photos! I love all of the natural light in this photo!

Next, up was a fall cake that matched the bride and grooms invitation. I love the way the cake turned out. I was unsure how the tree would look wrapped around the cake, but in the end I think it was really stunning. We added the bride and grooms intials to the tree to make it look like it was carved into the tree.

 I convinced the bride and groom to use a tree trunk as the "cake plate" to display the cake. I think this cake was perfect for this type of display and think the tree trunk fit the theme of the wedding and cake perfectly. To top it of I made edible love birds!

Last up was a more classic fall themed cake. We added fondant leaves, acorns, and pumpkins on each tier around the entire cake. The fall leaves really added a pop of color to the cake and brought it to life.
The sweetheart table!
I love the lantern centerpieces, and think the cake fit in the reception area nicely.

Well hope you enjoyed this last glimpse of fall. I wish I could hold onto fall a little longer, but now its time to get into the Christmas spirit and start baking cookies and making gingerbread houses!

Wednesday, November 14, 2012

Disney and a Special Birthday Surprise!

So for those of you that follow me on Facebook know I went on a family vacation to Disney back in October. This year the whole family was going including all of my nieces and nephews who had never been to Disney. It was especially special because it was my niece's Paige sixth birthday while we were there.
 So naturally I came up with a plan to make her a birthday cake, and have my wonderful husband drive it 900+ miles down to Florida.
 If anyone has ever delivered a cake, you know it is very stressful, so this was especially nerve wracking since the cake had to go so far. Luckily for my husband, I was not in the car with him for the drive, otherwise I'm sure I would have been driving him nuts checking on the cake. My husband did a great job though because the cake made it in one piece with no damage.
When I got down there I had to finish decorating the cake, adding Minnie's ears and her bow to the top tier. Sometimes when you are on the road you don't have all the tools you need so you have to improvise. I didn't have a steamer with me so I used the tea pot to remove the excess powdered sugar from the ears and bow.
For the design I decided to go with a similar design to my Mickey Mouse cake since it was so popular. I went with pink for Minnie instead of red because what little girl doesn't love pink.


I think she really liked her surprise!


Of course, I had to include some pictures from Disney!


We decided to go to the Mickey Mouse Halloween Party which, I would highly recommend. I think all of the kids had a blast seeing the special parade and trick-or-treating in the park.


So I hope you enjoyed this glimpse into our family vacation! If you live near Disney you have to go and see the parks decorated for the season!

Monday, October 29, 2012

Owen's not so scary Mickey Mouse Halloween Birthday

I am so excited to share this party with all of you because it is my nephew's 2nd birthday party! I have been planning his dessert table for months now, and I absolutely loved the way it came out. We decided on a Mickey Mouse Halloween theme for the party and desserts. I worked really hard to pull together a cohesive design for the table and decor. The desserts for the table included dirt cake shooters, cinnamon sugar cookies, spooky spider red velvet cupcakes, and chocolate covered Oreos. For the cake I really wanted to do something fun so I decided to do the characters dressed in their favorite Halloween costumes. I made all of the decor for the table including the Happy Birthday banner, the OWEN sign, the Mickey mummy wreath, the dessert table labels and paper pinwheels. I had so much fun planning and executing this table especially since it was for my favorite little guy!


 My nephew Owen loves cookies so of course I had to make some for him. The two big pumpkin cookies in the front I made especially for him to enjoy and he loved them.

 We added ghost faces to all of the meringues to add to the festivities!
 Here is the sign I made out of wood letters that I painted to match the theme.
 Last month while we were in Disney I stood in line to get a special Birthday wish from Mickey for Owen.
 My mother found these cute spider decorations for the cupcakes so we had spooky spider cupcakes, and a spider web cupcake holder for them.
 Close-up of all the characters! First up Mickey mummy!
 Minnie witch!
Frankenstien Goofy! 
Devil Donald! 

 In typical party fashion I totally forgot to capture any pictures during the party once I started playing with Owen. I am so bad with that! I did manage to get a few shots of him on opening his gifts and one of all three of us before we cut the cake.


Isn't he the cutest!

 
Love him!
Happy Birthday Owen! I hope you loved your cake. I can't wait to do it all over again next year! In case you missed Owen's 1st Birthday extravaganza you can check that out here. I love to see how much he has changed and grown over the year!  Don't forget to check out my Pinterest board for many more great Halloween inspired birthday ideas.